We are currently half way though our winter school holidays. It has been a lovely week doing a variety of activities.
We began the holidays by having a family gathering in the Blue Mountains, enjoying Christmas in July. I’m guessing this is not something that is ‘celebrated’ in the northern hemisphere, but not sure if it is just an Australian/New Zealand thing? It is our opportunity to get as close to a wintery white Christmas as Australia allows. And if we had been the weekend before, we would indeed have seen snow (although it was the end of June, not yet July), but not while we were there.
We stayed in a lovely old hotel that was built in the late 1800s. The kids all enjoyed exploring the many rooms and making their own movie. The hosts seemed quite happy for them to do so! On Saturday night we were treated to a special Christmas dinner, even Santa made an appearance!


After spending the weekend in the icy cold mountains, Monday was spent at the beach! You gotta love winter in Sydney!
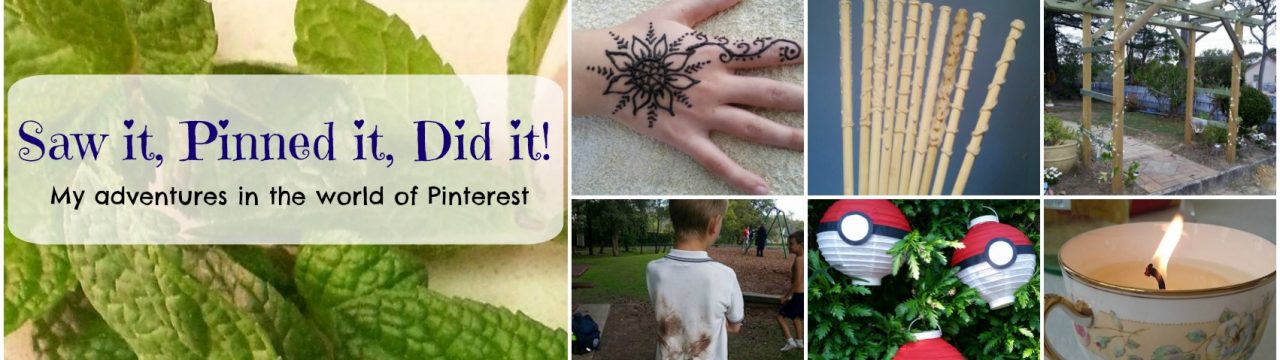
Anyway, moving on…a member of a facebook group I am a part of posted about doing her own henna tattoos at home (thanks, Lisa!). She had found a local Indian spice shop sold henna tubes. It looked like such an entertaining activity, I decided to see if I could find an Indian spice shop that sold them.
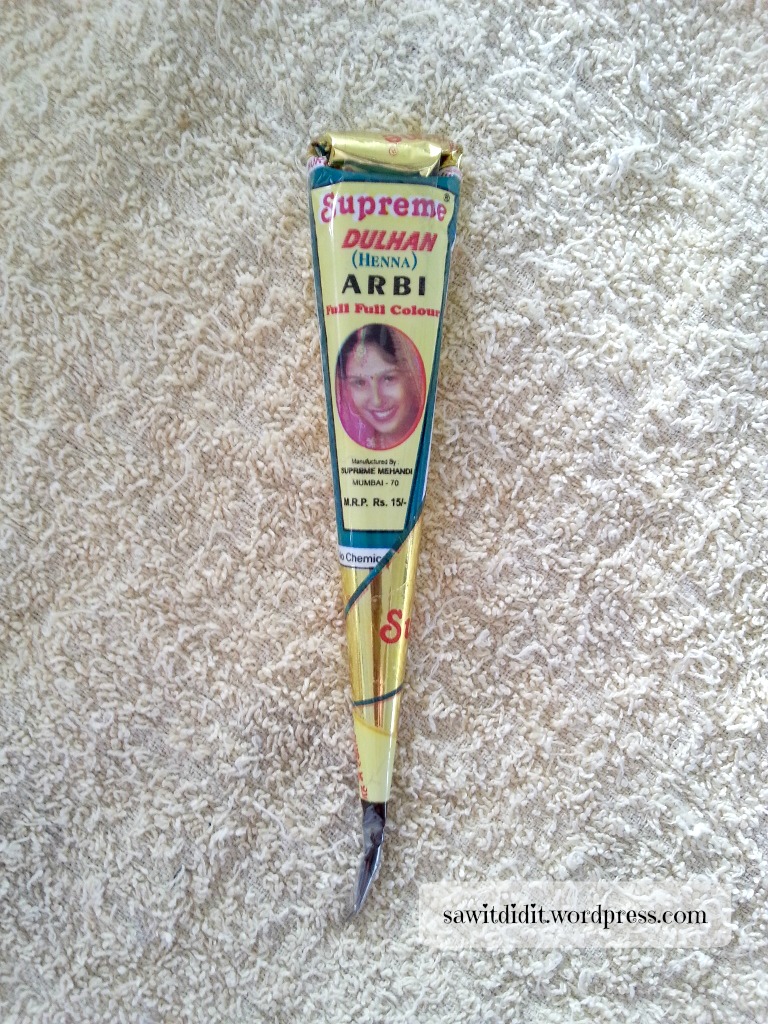
And there was! For local Sydney readers, I found them at Hornsby Indian Bazaar, 43a Florence St, Hornsby. Cost: $2.50 per tube.
There were no instructions on the tube, so I did a bit of googling to see if there was anything important I should know. Believe it or not, there is! So I have compiled a list of what I learnt. Bare in mind that I am no expert in this, I am just a beginner. So my list is not the be all and end all of henna tattooing. Just sayin’ 😉
- Wash the skin where you intend to apply the henna with a soap that doesn’t contain lotion. (Ie not the home-made one you’ve made from Dove soap!)
- Do a small patch test to see if you have any reaction to the henna paste. That’s just common sense. My son said he felt a slight tingling when I applied it to his hand, but he had no lasting or worsening symptoms. Perhaps it was just an unusual sensation for him and that was the best way he could describe it.
- Massage the henna tube for a minute or so to loosen up the paste and ensure it is all mixed nicely.
- Have some water and paper towel or tissues nearby.
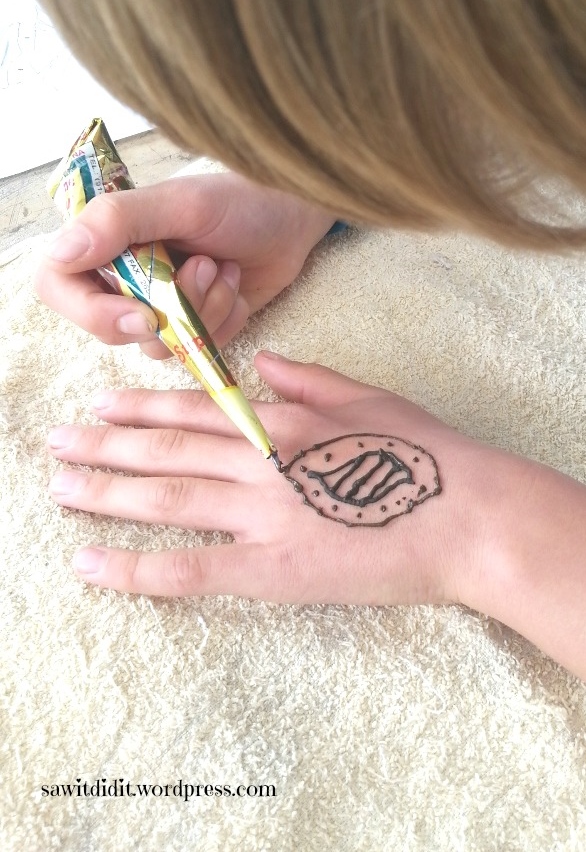
- Cut a small amount off the tip of the tube.
- Squeeze the tube gently and start designing! I started by squeezing some onto a spare bit of paper to get the feel of it.
- If you make a mistake you can quickly wipe it off with your damp tissue. Or just incorporate it into your design.
- Let the paste dry. From what I read, this can take from 5 minutes up to 30 minutes. In our case, we waited 30 minutes. The longer you leave it on, the darker the stain. I read conflicting information on whether the paste stains or not. To be safe, assume it will and clean up any bits before it gets walked into your carpet or squashed into your floor or towels.
- Be careful not to smudge the paste while it is drying!
- Once dry, you can gently scratch the paste off to reveal your tattoo.
- Rinse it under water, then pat your skin dry.
- Henna stains your skin, so as your skin cells flake off your tattoo will fade until it is gone. To make your design last as long as possible try not to rub it (so pat your hands dry after washing them), wear gloves when doing the washing up, and moisturise your skin. From what I see, certain brands recommend using their own special oil to maintain the tattoo. I’m sure you will be perfectly fine using whatever you have available. We have been using sorbolene cream after washing.
- The design gets darker the next day!
The tube I bought is just a tube full of paste. You can also get tubes with applicators. If you don’t have an Indian shop near you, check eBay or other on-line sellers for starter kits.
We browsed Pinterest for design inspiration, but I didn’t pin anything as all designs are personal, and really you just make it up as you go.
We had my niece and nephew come to visit and I thought this would be fun to do with them. Before they arrived, my son and I had a little practice. I asked him to choose a design, and he went with the Pokémon symbol of mega evolution:

Then he watched while I decorated my own hand

He thought it looked fairly easy, so he added some details to his hand himself
Here’s the first design I did for my niece

Then she did one on my hand
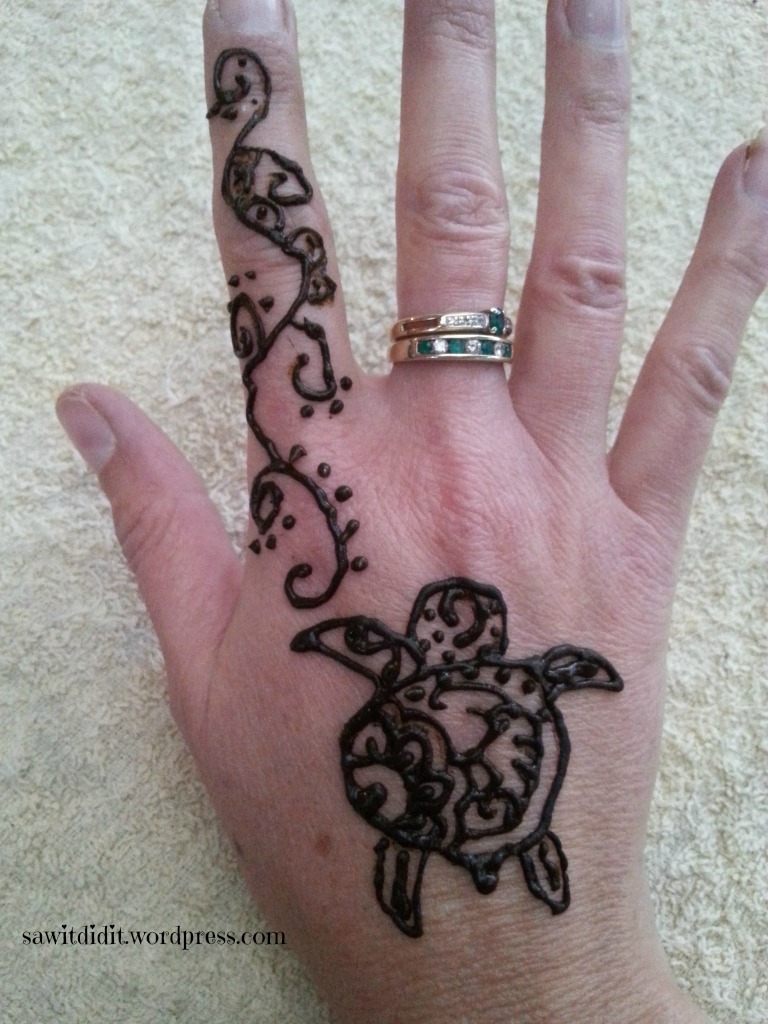
I’m sure it’s just a trick of the light that makes my fingers look like they’re turning blue…
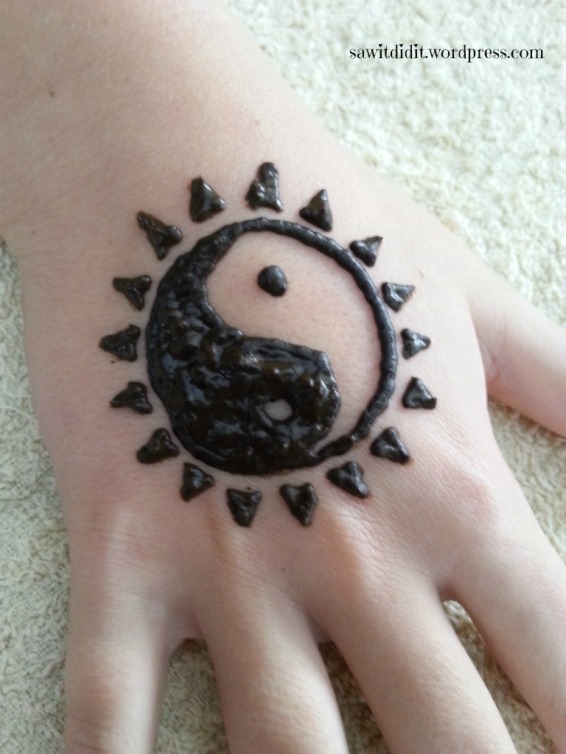
The boys decided on yin yang symbols
The next morning they wanted to do more!
Here are our finished designs, the kids have them on hands and wrists so we need 2 photos to see everything! You can see the difference in colour from the ones we did the first day.
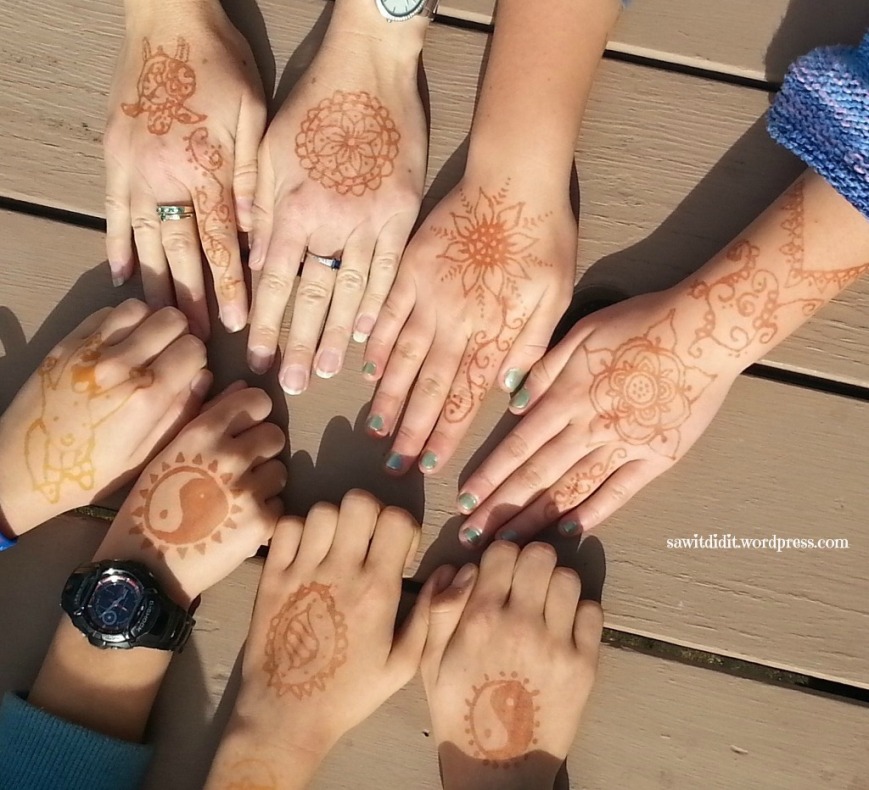
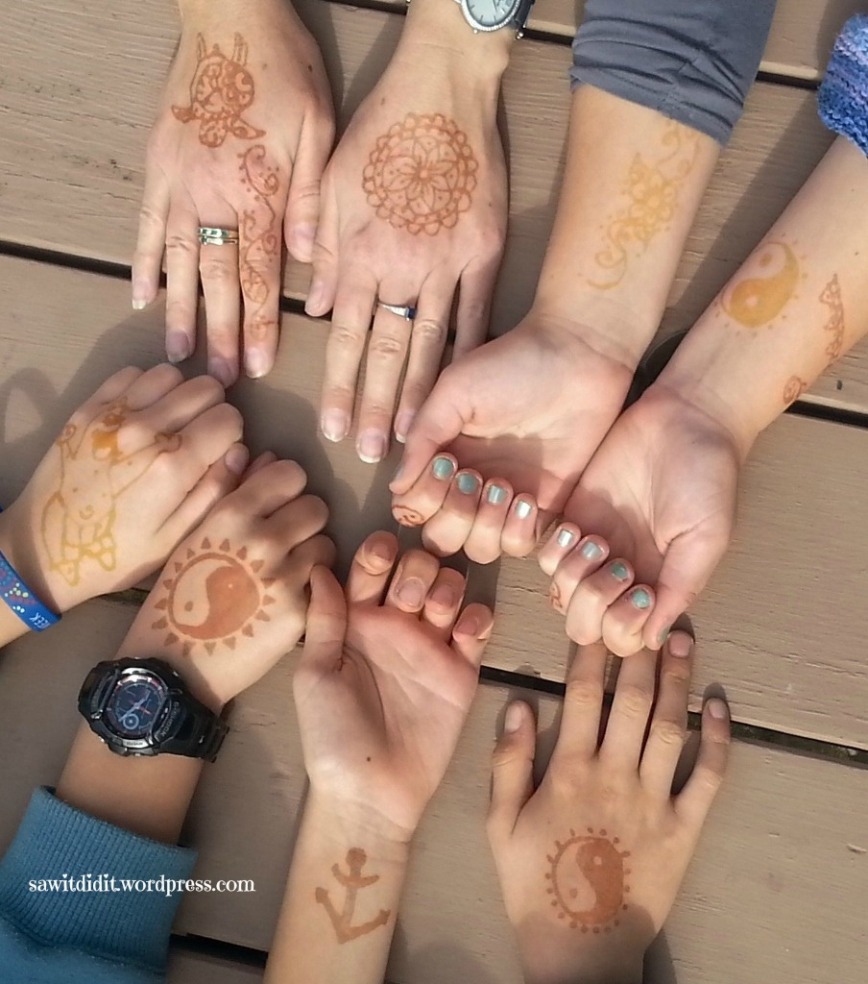
All these tattoos came from one tube, which still has plenty left in it. So that’s pretty good value, I think. I’ve sealed the tube with a bit of tape, and I read that storing it in the fridge keeps it fresher for longer. The kids loved searching Pinterest for ideas and inspiration, and there are certainly plenty for boys as well as girls.
I would definitely suggest giving this activity a go!
Linking up with:
Average But Inspired – The DIY Collective, Carrie Elle – The Mommy Club, A Glimpse Inside – The Handmade Hangout, Posed Perfection – Creative Ways, Have a Daily Cup of Mrs Olson – Share Your Cup, Sincerely, Paula – No Rules Weekend Bloghop, The Life of Jennifer Dawn – A Little Bird Told Me, The Pin Junkie, Life With Lorelei – Home Matters, Shoestring Elegance – What to Do Weekends, Raising Fairies and Knights – Bloggers Spotlight, Oh My Heartsie Girl – Friday Features, Strawberry Butterscotch – Saturday Shuffle, 24 Cottonwood Lane – Best of the Weekend, The Pinterested Parent – Sunday’s Best, Nifty Thrifty Things, Love of Home – Sundays at Home, My Husband Has Too Many Hobbies – Snickerdoodle Sunday, That Recipe – Happiness is Homemade, Plucky’s Second Thought – Cooking and Crafting With J&J, My Pinterventures – Merry Monday, Create With Joy – Inspire Me Monday, I Should be Mopping the Floor – Inspiration Monday, The DIY Mommy – Creative Corner, Claire Justine – Creative Mondays, Lou Lou Girls, Kathe With an E – You’re Gonna Love it, Our Home Away From Home – Tuesdays From Our Home, Being a Wordsmith – Turn it up Tuesday, The Dedicated House – Make it Pretty Monday, Cedar Hill Farmhouse – The Scoop, Yesterday on Tuesday – Project Inspired, The DIY Dreamer – From Dream to Reality, Oh My Heartsie Girl – Wonderful Wednesday, Savvy Southern Style – Wow us Wednesdays, Simply Made Fun – Wednesday Roundup, A Tray of Bliss – Five Star Frou Frou, 21 Rosemary Lane – Share Your Style, Domesblissity _ Thriving on Thursdays, Wondermom Wannabe – This is How We Roll, Lamberts Lately – Create it Thursday,

Pingback: Henna Turtle Swimming Tattoo Designs | Best Tattoo Ideas
Hi Fiona, I’ve featured this post at A Tray of Bliss today. Thanks for sharing it at Five Star Frou-Frou. Mimi xxx
LikeLike
Thank you, Mimi xx
LikeLike
Pingback: Pokémon-themed Bedroom Makeover | Saw it, Pinned it, Did it!
That hotel looks absolutely gorgeous! I’m totally jealous you got to go from mountains to beach. So very cool! I also love doing at-home henna tattoos! For your US readers, you can let them know that they can get DIY kits at Michaels if they’re interested. Thanks for taking the time to research and share your tips for this DIY at Merry Monday!
LikeLiked by 1 person
We are definitely very lucky!
I will be doing an update to this post, so will add you tip about Michaels. Thanks! xx Fiona
LikeLike
Wow! Looks like so much fun! 🙂
Thanks for joining Cooking and Crafting with J & J!
LikeLiked by 1 person
Pingback: Bastille Day nails | Saw it, Pinned it, Did it!
Pingback: The Handmade Hangout #109 Features
This looks like it was fun for all ages … no one gets left out!
LikeLike
Yes! I was pleasantly surprised how keen the boys were. They put in a lot of thought and research into their designs 🙂
LikeLike
I love henna! I even have a large mehndi design tattooed on my arm. It’s henna that will never fade!
LikeLike
Sounds beautiful, Hollie!
LikeLike
Thanks for sharing with SYC.
LikeLiked by 1 person