Pretty fabric flowers

I pinned this beautiful ‘vintage fabric flower’ some time ago, thinking how effective it looked and relatively easy to make:

pinterest flower

Original image and instructions here: http://www.easy-home-made.com/vintage-fabric-flower.html.

Finding some fabric wasn’t a problem, but that ‘eyelash yarn’ well, that posed a bit of a problem. I was sure I’d seem it before, but doing a search on the name didn’t bring up much. I guess it’s called something else here in Australia 🙂

A recent ‘Op Shop Hop’ (as my Sis-in-law has named it!) yielded success! In one shop there was a box of balls of wool, yarn, and lace, some of it very tangled. But I spotted some of this yarn and there was no way I was leaving without it! I spent some time untangling it, but in the end I had to cut it off. I had most of it by that stage anyway. Then it was off to the counter to find out how much they were going to charge me for this little gem. Many of the other items in the store seemed excessively priced, and there was no sign on this box which is a pet hate for me. If a shop can’t be bothered putting a price on something, then generally I can’t be bothered finding someone to ask. Do you feel that way too? Anyway, I nearly fell over when she told me it would set me back a whole 10c. Yes, that’s right – ten cents!!

So now I was ready to attempt this flower. And it was indeed easy and fairly quick to make.

As mentioned in the instructions linked above, I just eyeballed the fabric circles and they were certainly not neat. I didn’t want the yarn sticking out as far as she has, so I made mine a little shorter. I also only used 4 strands altogether – 3 on the bottom and one on the top.

I did this on a hot, windy afternoon. I recommend not doing the same. That little flame on my candle flickered like nobody’s business, surprisingly enough. You can’t really see in this photo, but I ‘oversinged’ some parts of the petals and they are a little brown 😦 It also made singeing the centres of the circles very difficult. But it’s all texture in the end, that’s what I tell myself! I stapled the layers together, following the instructions, then glued the sparkly bit in the middle. I was pretty pleased with my first effort:

Flower 1

I stuck a safety pin through the back and attached it to my cardigan.

My next effort included some personalization. I decided to substitute layers of tulle for every second layer of fabric.  I used my trusty hot glue gun to put it all together this time. And I had enough forethought to glue on a brooch back. I really like the extra texture from the tulle, it’s quite subtle:

Flower 2

My next two versions included more personalization. I tried to give the flowers petals. For the first one I cut quite pronounced petal shapes around my fabric circles. The tulle I left round, but slightly smaller than the fabric circles. It was quite fiddly singeing around these shapes, although I had started with smaller circles so perhaps that made a difference.

The second one I just cut a wavy shape out of my circle. It was much easier to singe, although I always have trouble getting the middle singed correctly. Even though I don’t intentionally cut my circles slightly different sizes, by the time I have shaped them I can see that they are. So I make sure to put the larger pieces on the bottom and the smaller on the top.  And they look pretty cute in pink 🙂

flower 3 4

After 4 attempts, I think I have found a design that I am very happy with – although I reserve the right to alter it later 🙂
What do you think of these flowers? Have you made something like this?

* Linked up with Mimi’s A Tray of Bliss, Being a Wordsmith – Traffic Jam Weekend Linky Party,

Birthday gift for a 15 year old girl

Last weekend we went to the birthday party of my lovely friend’s daughter. It’s been a couple of years since I was 15 *cough, cough*, so coming up with a present for this gorgeous girl was a little daunting. But I do know that she is into fashion and beauty, and not just in a typical teenage girl sort of way. So I thought a bottle of perfume might be well received. When I asked her mum if this was indeed something that she would like, I got a resounding ‘yes’! Then she added that as well as perfume, the birthday girl also loves all the lotions and potions that go along with it. So then my thinking changed. I could put together a collection of products chosen and created just for her. I had plenty of inspiration from Pinterest and various blogs I follow. So I took all these ideas and mixed them up a bit, and created some personalised products! I made bubble bath, hand/body scrub, hand/body lotion, and soap. They were all scented with rose, and the bubble bath and lotion were both tinted pink. I had a box lined with purple from another gift, which I filled with scrunched up purple tissue paper. I downloaded some pretty tags decorated with roses, on which I noted the name of the product as well as instructions for use. I think it looked and smelled beautiful, and was very pleased with the result! IMG_7051 IMG_7048 IMG_7054 And, just because I can, here is a photo of the beautiful table decorations: DSC02037 Pink, gold and sparkles, just perfect for a teenage girl! What do you think is the perfect gift for a 15 year old girl? * Some of you may have noticed that I originally posted this on my other blog, before I started this one. I have copied it here because it belongs here 🙂

Take a grandparent’s pillowcase…

My youngest niece turned 1 last week, and the week prior I suddenly had inspiration as to what to do for her birthday.

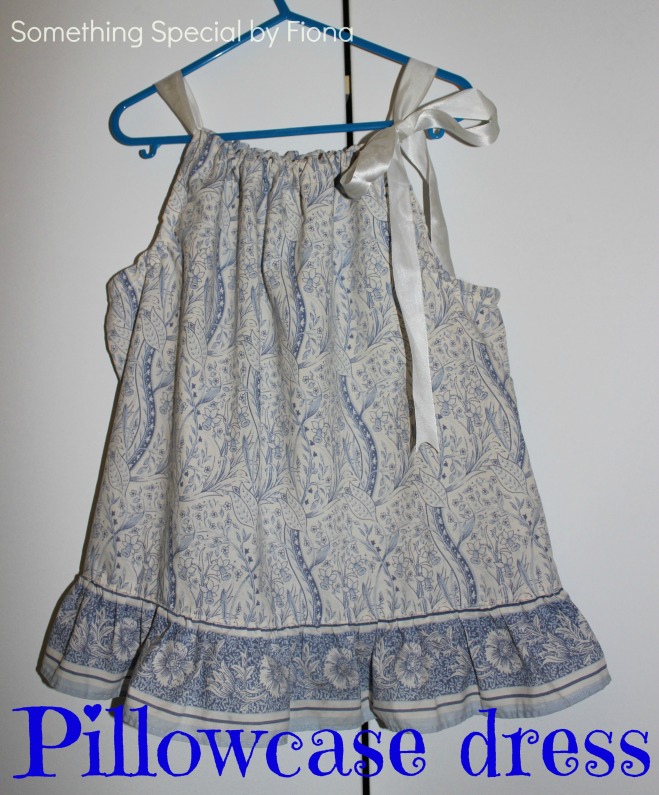
Popping up all over the internet are pillowcase dresses. Just do a search, there are blog posts, youtube tutorials, you name it! And they all say how easy it is to do. Using vintage pillowcases with pretty patterns look so cute and girly, and it looked like there were only a couple of seams to sew up. Surely I could do that!

The op shop that I usually go to doesn’t have much in the way of vintage prints and fabrics, plus it is still closed for it’s Christmas/New Year break. But I remembered seeing a pretty pillowcase somewhere in my travels around our home.

Perhaps I shouldn’t say this, but it was being used as a rag in the garage.

So I gave it couple of days soaking, then washed it, and it actually turned out all right 🙂

All the tutorials I saw were made from a standard pillowcase, but this was a boomerang one. And it had *ahem* ‘garage’ stains on it. So I looked at it carefully to find the best bit to use. Luckily my niece is still a toddler, so it didn’t need to be too big!

So, after procrastinating as long as I could, I took the scissors to it, cutting off the end I would use, and unpicking the frill to use around the bottom of the dress. I pulled my trusty, but underused, sewing machine out of the depths of the cupboard, and started work.

I procrastinated some more, but got it all done in 3 hours (including procrastination time!).

Then I looked at it, did a little happy dance for completing it, and thought about where I’d found it.

So back it went into a bucket to soak again. Then it got washed again. And all was good…

Image

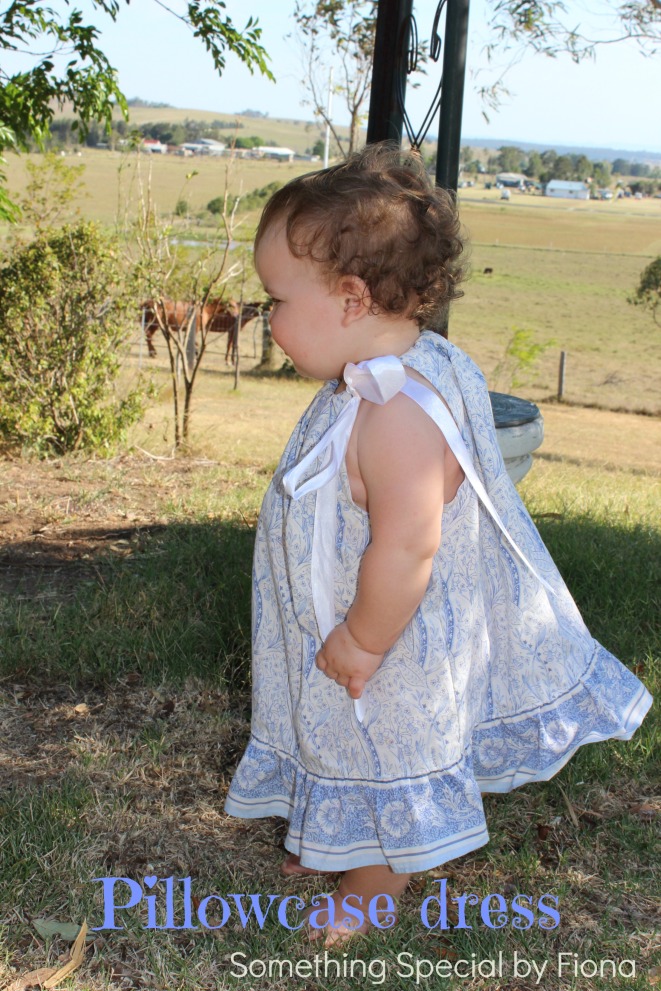
I was worried that it would be too small, but it turns out it is still a bit big for the little poppet. I hope she will get plenty of wear out of it.

Image

As for where the pillowcase originally came from – when my mum saw it, she immediately recognised it as one my grandmother bought for my grandfather (her parents). My grandmother died in 1988. I hope they look down on their great, grand daughter and appreciate her wearing something so special.

Have you seen or made a pillowcase dress? How did it turn out for you?

Did you know that if you don’t personally have any little girls you could make a pillowcase dress for, there are still plenty of girls around the world who would love to have a beautiful dress. Two groups I found that co-ordinate sending packages of dresses ( and pinned to my Craft board on Pinterest) are Dress a Girl Around the World (here is the Australian page), and Little Dresses For Africa. If you are interested, you might find a group near you 🙂

* Some of you may have noticed that I originally posted this on my other blog, before I started this one. I have copied it here because it belongs here 🙂

Linking up with:

Table and Hearth – DIY Like a Boss, Average But Inspired – The DIY Collective, Milk and Cuddles – The Mommy Club, 21 Rosemary Lane – Share Your Style, Too Much Time on my Hands – The Handmade Hangout, Posed Perfection – Creative Ways, Have a Daily Cup of Mrs Olsen – Share Your Cup, Lamberts Lately – Create it Thursday, Domesblissity – Thriving on Thursdays, Wondermom Wannabe – This is How We Roll, Sincerely, Paula – No Rules Blog Hop, The Life of Jennifer Dawn – A Little Bird Told Me, A Tray of Bliss – Five Star Frou Frou, Love Bakes Good Cakes – Freedom Fridays, The Pin Junkie, Life With Lorelei – Home Matters, Shoestring Elegance – What to do Weekends, Raising Fairies and Knights, Oh My Heartsie Girl – Friday Features, Strawberry Butterscotch – Saturday Shuffle, 24 Cottonwood Lane – Best of the Weekend, The Pinterested Parent – Sunday’s Best, The Interior Frugalista – DIY Sunday Showcase, Thoughts From Alice – Sundays at Home, My Husband Has Too Many Hobbies – Snickerdoodle Sunday, That Recipe – Happiness is Homemade, Coombe Mill – Trash to Treasure, Plucky’s Second Thought – Cooking and Crafting With J&J, My Pinterventures – Merry Monday, Claire Justine – Creative Mondays, Create With Joy – Inspire Me Monday, I Should Be Mopping the Floor – Inspiration Monday, Yesterday on Tuesday – Project Inspired, Pastels and Macarons – The Creative Corner, Lou Lou Girls, Kathe With an E – You’re Gonna Love It, Our Home Away From Home – Tuesdays at Our Home, Cozy Little House – Tweak it Tuesday, The Dedicated House – Make it Pretty Monday, Cedar Hill Farmhouse – The Scoop, Ramblings of a (Bad) Domestic Goddess – Turn it Up Tuesdays, The DIY Dreamer – From Dream to Reality, Oh My Heartsie Girl – Wonderful Wednesday, Savvy Southern Style – Wow us Wednesday, The Crafty Wife – Wednesday Roundup,