Getting Ready for Halloween

Around here most people don’t decorate for Halloween for much more than a few days. We usually put our decorations up on 31st October, and they are taken down some days later…when we get around to it!

Last year I was coming up with ideas and printing things off on the actual day. You can read about what we did last year here.

So this year the decorations are pretty much sorted, I just have to get down the box and put them up.

But this year we will be going to our friends’ house for dinner, after we’ve taken the boys out trick or treating.

So how do we deal with visiting Trick or Treaters, while not making it obvious that we are not home? (Actually, we haven’t quite decided on that one – there probably will be one of us here, while one of us is with the trick or treating group.)

I had an idea!

Firstly, I had in mind to make our treats ‘zombie anti-virus pills’, rather than just your usual lollies. I used this pin from my Halloween Pinterest board as my inspiration for this idea. When I’ve done something themed before it’s been appreciated by the kids and their parents.

I found this container full of small tic tacs which would work well.

Halloween sawitdidit.wordpress.com

And the ‘warning’ tape I knew could be put to great use once we left for dinner 😉

So I made up a few new signs:

Halloween Half of these treats contain zombie anti virus sawitdidit.wordpress.com

Halloween - if you take more than one treat .... sawitdidit.wordpress.com

I have a silver platter on which I will present the tic tac boxes, and I will have the two signs displayed above the platter. And the platter came from the op shop, so if it disappears it won’t ruin my day. But I’ll be unleashing the zombies on whoever might do that!

After we’ve walked around the block (visiting houses where people we know live) trick or treating, we’ll drop back past our house and tie up some of the warning tape across the driveway. And I’ll attach this sign:

Halloween - Danger Danger All who enter will be fed to the zombies sawitdidit.wordpress

All of these signs were made very simply. I downloaded two free fonts from Dafont.com – Miserable, and Anywhere But Home. Miserable is the ‘Danger Danger’ font, and Anywhere But Home is the ‘all who enter…’ font. The other signs just used fonts already in Microsoft Word. The zombie faces came from clipart, and the zombie figures I googled.

I know from previous experience that just turning all the lights off once all our treats are gone doesn’t deter people from knocking on our door later in the evening. Hopefully this will!

What do you think? Will it work?

I’ll update when it’s all over!

Sharing with:

Lamberts Lately – Create it Thursday, Table and Hearth – Think and Make Thursday, Love Bakes Good Cakes – Freedom Fridays, The Pin Junkie, To Simply Inspire – The Mommy Club, 21 Rosemary Lane – Share Your Style, Too Much Time on My Hands – The Handmade Hangout, Posed Perfection – Creative Ways, A Daily Cup of Mrs Olsen – Share Your Cup, The Princess and Her Cowboys – Wednesday Roundup, Savvy Southern Style – Wow us Wednesdays, Domesblissity – Thriving on Thursdays, Life With Lorelei – Home Matters, A Tray of Bliss – Five Star Frou Frou, Natasha in Oz – Sundays Down Under, The Interior Frugalista – DIY Sunday Showcase, Domestic Superhero – Pinworthy Projects, Oh My Heartsie Girl – Friday Features, 24 Cottonwood Lane – Best of the Weekend, The Pinterested Parent – Sunday’s Best, My Pinterventures – Merry Monday, Claire Justine – Creative Mondays, Create With Joy – Inspire Me Monday, I Should be Mopping The Floor – Inspiration Monday, Julie’s Lifestyle – Cooking and Crafting With J&J, Thoughts From Alice – Sundays at Home, Yesterday on Tuesday – Project inspired, Lou Lou Girls Fabulous Party, Merry About Town – Monday Funday, Kathe With an E – You’re Gonna Love it, Our Home Away From Home – Tuesdays at Our Home, Cosy Little House – Tweak it Tuesday, Pastels and Macarons – The Creative Corner,

Coffee and Oatmeal Body Scrub

Last week I posted on Instagram (saw.it.pinned.it.did.it.blog if you want to follow along) that I had started making some exfoliating bars. I had found a few different ideas which I pinned to my Beauty Pinterest board.

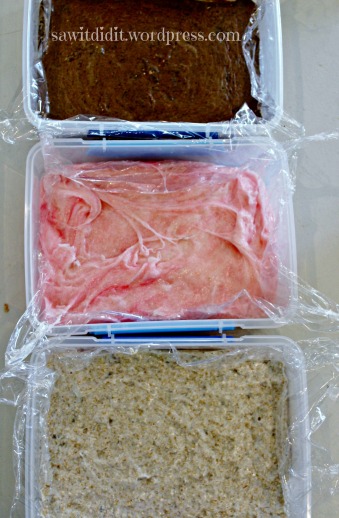
Reading through the recipes, they seemed to have a ratio of 1 part soap base and oil, to 1 part exfoliating product. Mostly they used a purchased soap base. Since it is easy enough to make your own soap, I started with making my own mix of Lux flakes and water, then added an amount of olive oil. I divided my soap base mix into three portions, then added coffee grounds, sugar, and oatmeal. I added a drop of red food colouring to the sugar mix 🙂

Exfoliating bars, have to say I didn't like them at all. But I took the idea and made something that I like much better. sawitdidit.wordpress.com

I waited rather impatiently for them to dry, but had to have a little try the next day.

I tried the sugar one first. It didn’t lather at all, and the sugar had dissolved in the hot soap mix, so there was no exfoliating going on. I had done this mix last, considering the issue of dissolving sugar grains, but it was obviously still too hot.

The oatmeal, and coffee cubes worked better but I didn’t find them very user friendly. They broke up into small pieces which made it hard to rub into my skin. I was just trying them on my hands.

If you were to try this idea – which does look promising in the pins – you would probably follow the recipe a bit closer than I.

I could play around with the soap base and oil mix and see if I could make it work. But the truth is, I don’t want to. Because I think a loose mix works much better!

A few years ago I made sugar scrub as Christmas gifts for some of my family. So easy – I think it was simply sugar, oil and lemon juice. I thought it worked fine, but mum didn’t like how rough the sugar felt on her hands. Which is why I tested the bars, and the varieties of coffee and oatmeal, to see if they felt a little softer. They did.

So I took the ideas that worked, left out the bits that didn’t, and made a Coffee Oatmeal Body Scrub.

We use a coffee pod machine, so I just carefully cut open the lids of the used pods and tipped out the coffee grounds. I spread the grounds on a plate and put it outside to dry. You could spread it on a baking tray and put it in the oven for a short while on a low heat, but make sure you don’t forget about it!

I blitzed up the rolled oats in my little blender until they were quite fine. I don’t want my drains getting blocked up!

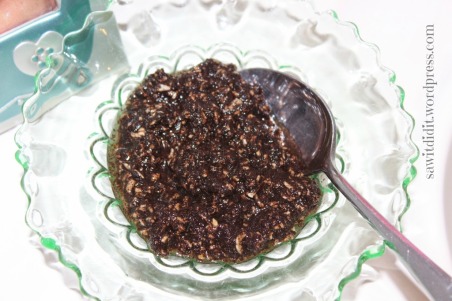
I combined roughly equal quantities of coffee and oatmeal in a small bowl, then stirred in some oil. You could use olive oil (as I did today), macadamia oil, almond oil, whatever you like! I just added the oil until it all came together, so there was not too much sitting on top. You could also add a few drops of essential or fragrant oil to make it smell nice, I didn’t bother.

It doesn’t look very attractive…

Coffee and oatmeal body scrub sawitdidit.wordpress.com

…but boy does it feel good!

Use it in the shower, or keep some near the sink to clean your hands after you’ve been working in the garden.

You can use this all over your body, but every body is different so just see how you go. I wouldn’t use it on my face, although there are a lot of coffee facial scrub recipes out there. See what works for you. A small amount goes a long way, so don’t overdo it! And as with any exfoliator, you wouldn’t use this every day.

Some may say there could be issues with the ingredients clogging your pipes, but you only use a tiny amount, and not every day, so I can live with that.

And if rubbing coffee over your body isn’t your thing, you could substitute with sugar. Brown sugar is much finer than regular sugar if you are like my mum and want something ‘kinder’ on your skin. And your used coffee grounds can go on your garden if you are not going to use them for beauty products. Don’t waste it!

Coffee and oatmeal body scrub . sawitdidit.wordpress

Store your body scrub in a clean, air-tight container. It doesn’t need to be kept in the fridge. I only make up a smallish amount at a time, and it seems to last well.

Have you tried making your own body scrub?

Linking up with:

Table and Hearth – Think and Make Thursday, To Simply Inspire – The Mommy Linkup, Too Much Time on my Hands – The Handmade Hangout, 21 Rosemary Lane – Share Your Style, Posed Perfection – Creative Ways, A Daily Cup of Mrs Olsen – Share Your Cup Thursday, The Princess and Her Cowboys – Wednesday Roundup, Lamberts Lately – Create it Thursday, Savvy Southern Style – Wow us Wednesday, A Tray of Bliss – Five Star Frou Frou, Love Bakes Good Cakes – Freedom Fridays, The Pin Junkie, Life With Lorelei – Life Matters, Domesblissity – Thriving on Thursdays, Domestic Superhero – Pinworthy Projects, Oh My Heartsie Girl – Friday Features, 24 Cottonwood Lane – Best of the Weekend, The Pinterested Parent – Sunday’s Best, Natasha in Oz – Sundays Down Under, The Interior Frugalista – DIY Sunday Showcase, Julie’s Lifestyle – Cooking and Crafting with J & J, My Pinterventures – Merry Monday, Claire Justine – Creative Mondays, Create With Joy – Inspire Me Monday, I Should be Mopping The Floor – Inspiration Monday, Thoughts From Alice – Sundays at Home, The Foley Fam – Sunday Funday, Yesterday on Tuesday – Project Inspired, Lou Lou Girls Fabulous party, Merry About Town – Monday Funday, Kathe With an E – You’re Gonna Love it Tuesday, Our Home Away From Home – Tuesdays at Our Home, Cozy Little House – Tweak it Tuesday

Lemon Delicious Pudding – Our Favourite!

You may remember a little while ago I tested Lemon Magic Cake, and frankly, we weren’t overly impressed.

In that post I told you I would share my grandmother’s recipe for Lemon Delicious Pudding, which has been one of my favourite desserts since forever! And today’s the day!

It is similar to Magic Cake, but it only has two layers – light, spongy cake on top, custardy on the bottom. Depending on your oven, how long you cook it, the size of your cooking dish, the angle of the sun at the time…(perhaps not) will determine how much cake and how much custard you end up with. Today I cooked it in a larger dish than I normally use, and there is not so much custard. But it still tastes delicious!

So, without further ado, here is the recipe:

60g butter

1/2 cup sugar

pinch of salt (I use unsalted butter. If you use salted butter you can leave this out)

1/2 cup Self Raising flour

Grated rind and zest of one large lemon

2 large eggs, separated

1 1/4 cups milk

*Cream your butter and sugar.

*Sift flour and salt together and mix in, then add the grated lemon rind and juice.

*Mix together egg yolks and milk, then fold into pudding.

*Fold in stiffly beaten egg whites.

*Pour into a greased 4-cup ovenproof dish, and place the dish into a deep baking tray. Add enough water to come half way up the sides of your baking dish.

*Bake in pre-heated oven 180 degrees Celsius for 45 minutes, or until sponge is set and golden on top.

*Serve warm with cream or ice-cream. (Served cold it is still perfectly delicious!)

Earlier today I shared on Facebook and Instagram the lemon I used for this pudding:

large lemon

Often large lemons like these don’t have a lot of juice. But this one gave me about 1/2 cup which was perfect! It came from The Resident Handyman’s parents’ garden.

You do know the tips to get the most juice from your citrus fruit don’t you? Roll it hard on your kitchen bench, or give it a quick blast in the microwave. Either way breaks down the fibres so they release more juice.

When you’ve added the milk, this is a very runny mix. Careful not to spill it as you put it in the oven!

Lemon Delicious Pudding sawitdidit.wordpress.com

I had my oven a little lower than 180C, and I only cooked it for 40 minutes. Thirty five minutes would have been just about perfect, I think.

I left it to cool a little, then dusted it with icing sugar.

You know that boiling water left in the baking tray? Carefully poor it on some weeds in your paving, it will kill them 😉

Lemon Delicious sawitdidit.wordpress.com

Lemon Delicious Pudding . sawitdidit.wordpress

Store any leftovers in the fridge, if you have any! Mind you, the flavour develops over time so it can taste even more delicious the next day.

Eat it warm or cold, but just try stopping at one serving!

Lemon Delicious Pudding, we think it's better than Magic Cake! sawitdidit.wordpress.com

If you love lemon flavoured desserts, you’ll love this pudding!

If you have tried Lemon Magic Cake, let me know how you think it compares 🙂

Linking up with:

A Tray of Bliss – Five Star Frou Frou, The Pin Junkie, Love Bakes Good Cakes – Freedom Fridays, Table and Hearth – Think and Make Thursdays, Savvy Southern Style – Wow us Wednesday, Domesblissity – Thriving on Thursdays, Katherine’s Corner – Thursday Favourite Things, Shoestring Elegance – What to do Weekends, Organised 31- This is How I Roll, 21 Rosemary Lane – Share Your Style, Sincerely Paula, Chic on a Shoestring – Flaunt it Friday, Too Much Time on my Hands – Homemade Hangout The Life of Jennifer Dawn – A Little Bird Told Me, The Girl Creative, Life With Lorelei, Natasha in Oz – Sundays Down Under, It’s Overflowing – Share Your Creativity, The Interior Frugalista – DIY Sunday Showcase, Mother 2 Mother, Thoughts From Alice – Sundays at Home, The Foley Fam – Sunday Funday, Julie’s Lifestyle – Cooking and Crafting with J and J