DIY Tulle Fairy Lights

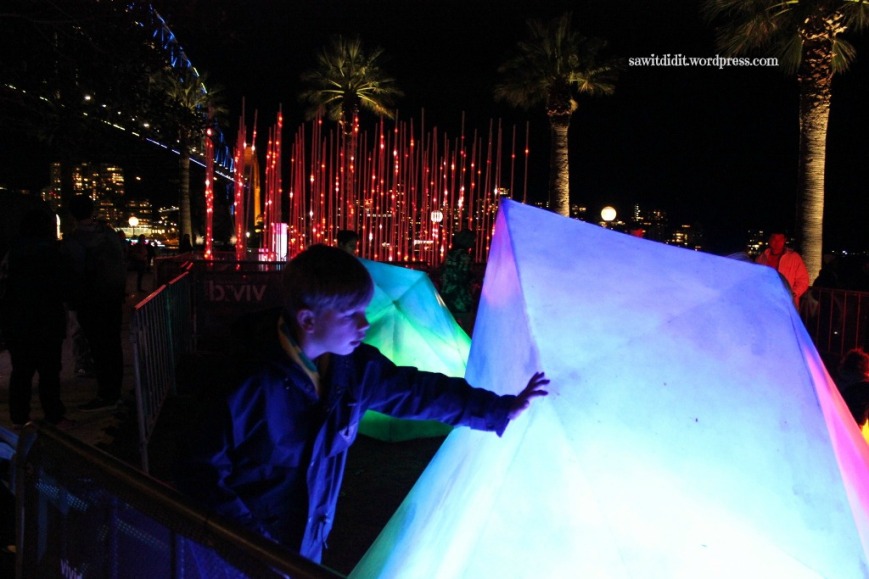
Recently I was given a set of alphabet fairy lights (thanks Phil and Em!) You may have seen them, they come with clear plastic letters which you attach to each light and spell out a word or two. Very cool!

But then I thought I could do something more with them…so off I went to Pinterest to look for some inspiration. I pinned a couple of ideas to my Craft board, then I sort of worked it out myself 🙂 Mind you, I’m sure I am not the first person to do it this way!

DIY tulle fairy lights.

They were actually quite easy to make, the only obstacle was a certain kitty who insisted on ‘helping’!

Cue gratuitous cat photos…

So, I had to shut him outside for a bit so I could continue…

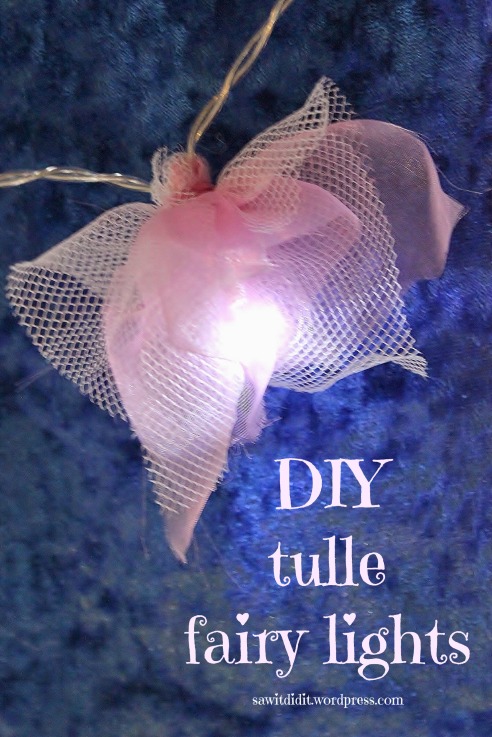
What you need: Tulle or other fine, soft fabric in colour/s of your choice, scissors, ruler, small rubber bands (I used loom bands), fairy lights.

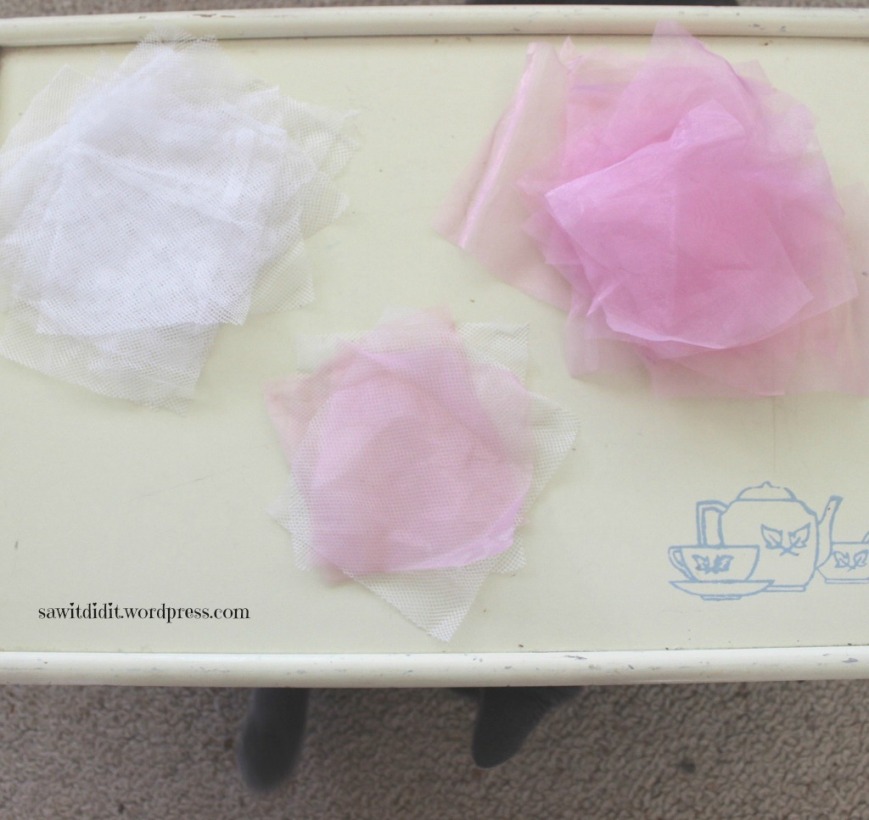
I had some fine tulle, and some thin pink fabric (curtains I picked up at the Op Shop ages ago) that I have previously used to make some pretty fabric flowers. I tried a couple of variations using just the white tulle, but decided to add the pink in as well.

I cut some (very rough) shapes about 10cm square, allowing four squares per bulb, two pink and two white. I wasn’t too particular about making them perfect.

Can you see who is back ‘helping’??

DIY tulle fairy lights 1

I layered the four squares in alternate colours. I really don’t think it would make any difference if you carefully lined up the squares, or mismatched them as I have done.

DIY tulle fairy lights 2

I placed the bulb in the middle of the square

DIY tulle fairy lights 4

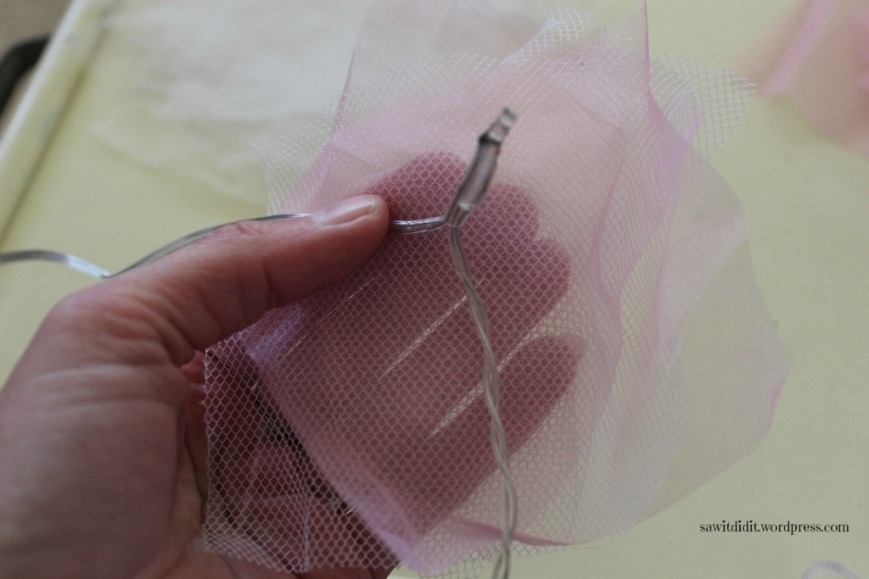
Then folded it up around the bulb

DIY tulle fairy lights 5

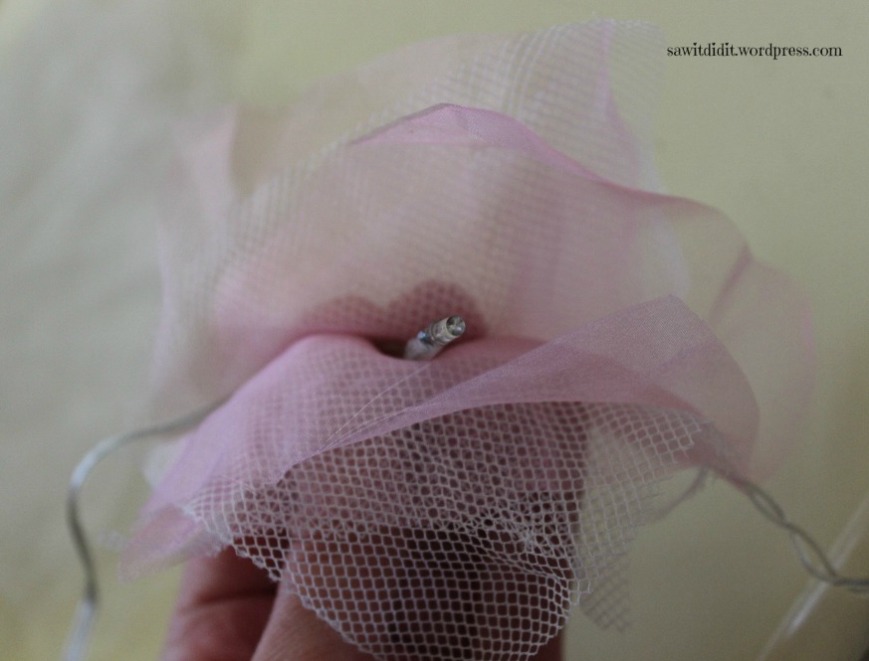
and gathered up the sides to make a flower shape.

DIY tulle fairy lights 7

Next, simply slip a small rubber band over the top to hold it secure. I discovered the stash of loom bands sitting forgotten on our son’s bookcase, and used some of those. You’ve got some of those, too, haven’t you??

DIY tulle fairy lights 6

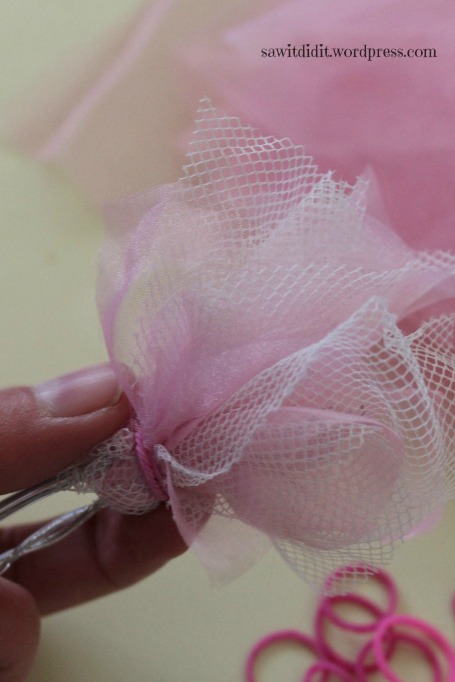
Adjust the ‘petals’ attractively around the bulb. Then repeat for each of the remaining bulbs.

DIY tulle fairy lights, so pretty!

These bulbs are very low wattage, and don’t get very hot at all. So I don’t feel worried about them overheating. In fact, I’ve had them on for several hours tonight, and they are not even warm. But best to be safe, check yours regularly and you may choose not to leave them unattended.

And best of all, the decoration can be removed very easily if required.

DIY tulle fairy lights 8

DIY tulle fairy lights.

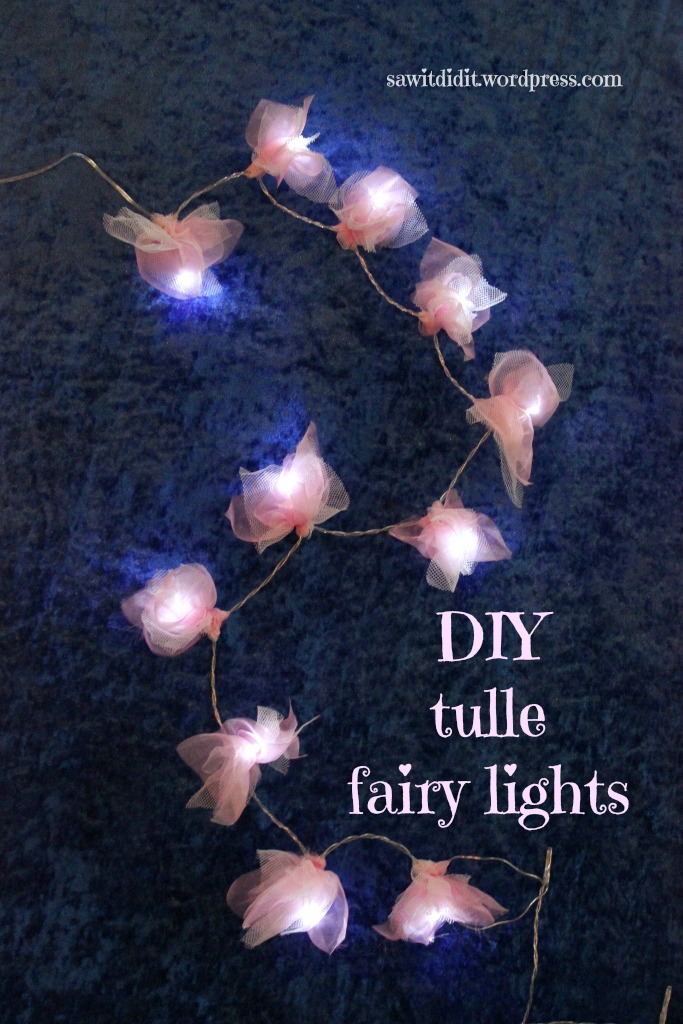
I love the soft light they give out. Don’t you?

Linking up with:

A Tray of Bliss – Five Star Frou Frou, Love Bakes Good Cakes – Freedom Fridays, The Pin Junkie, Life With Lorelei – Home Matters, Shoestring Elegance – What to do Weekends, Tatertots and Jello – Link Party Palooza, Raising Fairies and Knights – Bloggers Spotlight, Oh My Heartsie Girl – Friday Features, Strawberry Butterscotch – Saturday Shuffle, The Interior Frugalista – DIY Sunday Showcase, My Husband Has Too Many Hobbies – Snickerdoodle Sunday, The Pinterested Parent – Sunday’s BestLove of Home – Sundays at Home, That Recipe – Happiness is Homemade, Nifty Thrifty Things, Plucky’s Second Thought – Cooking and Crafting With J&J, My Pinterventures – Merry Monday, Claire Justine – Creative Mondays, Create With Joy – Inspire Me Monday, I Should Be Mopping The Floor – Inspiration Monday, Yesterday on Tuesday – Project Inspired, Lou Lou Girls, Kathe With an E – You’re Gonna Love it, Our Home Away From Home – Tuesdays at our Home, Cozy Little House – Tweak it Tuesday, Ramblings of a (Bad) Domestic Goddess – Turn it Up Tuesdays, The Dedicated House – Make it Pretty, Cedar Hill Farmhouse – The Scoop, The DIY Dreamer – From Dream to Reality, Oh My Heartsie Girl – Wonderful Wednesday, Savvy Southern Style – Wow us Wednesdays, Simply Made Fun – The Wednesday Roundup, Average But Inspired – The DIY Collective, Milk and Cuddles – The Mommy Club, 21 Rosemary Lane – Share Your Style, Have a Daily Cup of Mrs Olson – Share Your Cup, Domesblissity – Thriving on Thursdays, Wondermom Wannabe – This is How We Roll, The Life of Jennifer Dawn – A Little Bird Told Me, Too Much Time on my Hands – The Handmade Hangout, Sincerely, Paula – No Rules Weekend Blog Party. Coombe Mill – Trash to Treasure.

Vivid Sydney 2016

Last week we had a few extra activities on, which threw my routine right out the window! But that’s ok, it’s good to have a bit of change every so often 🙂

So this week I have nothing Pinterest-themed to share with you. But I will share a night out that we had at Vivid Sydney.

Vivid Sydney is an annual light, music and ideas festival, and takes place over about 3 weeks of May and June. The website says it is now the largest festival of its kind in the world! We have been going since 2012, which I always thought was the year it started. But my research today tells me it has been going since 2009. Perhaps it was more widely publicised in 2012…

Anyway…each year it gets bigger and bigger. More areas to visit, more performances to enjoy. Part of the program is musical acts, and interesting speakers. But we just like to enjoy the light show portion! The displays are amazingly creative, and most are interactive. There is no ‘look but don’t touch’!

Although there are a few different areas around the city to visit, we have set our ‘tradition’. We start under the Harbour Bridge, walk around the harbour foreshore, Circular Quay, to the Opera House. Then back again. We do sometimes walk around the surrounding streets if we see something interesting, or if an area is particularly crowded. This year we continued past the Opera House, in to the Botanic Gardens. This is a new precinct this year.

Our tips! Wear suitable walking shoes, taking note of the weather conditions (ie storms as we have just experienced), warm clothes (goes without saying – it’s winter!), try and go mid-week. Weekends seem to be mad. I read that last weekend some of the streets, including around the Opera House, were closed as there were so many people.

We were pleased to see there were good walkways in the spots where it gets quite muddy. Being that it is winter here in Sydney, and we do often get rain at this time of year! I now wear boots as a matter of habit when visiting Vivid, as some years the ground just couldn’t cope with all the foot traffic coupled with rain.

So, here are a few of the photos I took of our walk around the city. There are much better ones out there on social media. I didn’t have a tripod, but the ones taken on my phone turned out better than the ones on my DSLR in some cases!

Touching these shapes produced louder music. They also changed colour.

Vivid Sydney 4

These also changed colour

Vivid Sydney 5 Vivid Sydney 6

This collection of lights and mirrors was fun to walk through!

Vivid Sydney 1Vivid Sydney 9

Here, you are encouraged to lie down and let the gentle music and changing colours calm you

Vivid Sydney 8 Vivid Sydney 7

Special pads on the ground felt your movements, and transferred them to ghostly shapes on the wall.

Vivid Sydney 10

The story unfolding on this building was spectacular. One of my favourite displays!

Vivid Sydney 11

The hugging tree 🙂 The more you hug it, the more the lights travel up the tree.

Vivid Sydney 13

It was very funny watching parents pushing their children into this exhibit! I am reliably informed that it didn’t hurt a bit!

Vivid Sydney 14

Another of my favourite exhibits was the Cathedral of Light, in the new precinct of the Botanic Gardens. The stone wall around the harbour leading up to the Cathedral made a great entrance

Vivid Sydney 2

And the Cathedral itself was spectacular! So simple, but so effective!

Vivid Sydney 17

The far end dipped down slightly, so it looked like it would never end:

Vivid Sydney 18

Each little light was actually a flower!

Vivid Sydney 3

And just to finish off, here are a few photos of the city lights, our beautiful Harbour Bridge, and the amazing display on the Opera House

Vivid Sydney 12

Vivid Sydney 16 Vivid Sydney 15

Vivid Sydney Opera House 5  Vivid Sydney Opera House 3

Vivid Sydney Opera House 2  Vivid Sydney Opera House 4

Vivid Sydney Opera House 6  Vivid Sydney Opera House 8

Vivid Sydney Opera House 7

Vivid Sydney Opera House 1


Vivid Sydney Opera House 9

Who else has fantastic, free, family-friendly entertainment like this in their city??

Linking up with:

Milk and Cuddles – The Mommy Club, 21 Rosemary Lane – Share Your Style, Too Much Time on my Hands – The Handmade Hangout, Posed Perfection – Creative Ways, Have a Daily Cup of Mrs Olsen – Share Your Cup, Lamberts Lately – Create it Thursday, Domesblissity – Thriving on Thursdays, Wondermom Wannabe – This is How we Roll, Sincerely, Paula – No Rules Weekend Bloghop, The Life of Jennifer Dawn – A Little Bird Told Me, A Tray of Bliss – Five Star Frou Frou, Love Bakes Good Cakes – Freedom Fridays, The Pin Junkie, Life With Lorelei – Home Matters, Shoestring Elegance – What to do Weekend, Tatertots and Jello – Link Party Palooza, Raising Fairies and Knights- Blogger’s Spotlight, Oh My Heartsie Girl – Friday Features, Strawberry Butterscotch – Saturday Shuffle, The Pinterested Parent – Sunday’s Best, The Interior Frugalista – DIY Sunday Showcase, Love of Home – Sundays at Home, My Husband Has Too Many Hobbies – Snickerdoodle Sunday, That Recipe – Happiness is Homemade, Plucky’s Second Thought – Cooking and Crafting With J&J, My Pinterventures – Merry Monday, Claire Justine – Creative Mondays, Create With Joy – Inspire Me Monday, I Should be Mopping The Floor – Inspiration Monday, The Foley Fam – Dream Create Inspire, Yesterday on Tuesday – Project Inspired, Pastels and Macarons – The Creative Corner, Lou Lou Girls, Kathe With an E – You’re Gonna Love it, Our Home Away From Home – Tuesdays at Our Home Cozy Little House – Tweak it Tuesday, Ramblings of a (Bad) Domestic Goddess – Turn it up Tuesdays, Cedar Hill Farmhouse – The Scoop, The DIY Dreamer – From Dream to Reality, Oh My Heartsie Girl – Wonderful Wednesday, Savvy Southern Style – Wow us Wednesdays, Simply Made Fun – Wednesday Roundup,

Harry Potter-inspired Birthday Party (Part 5, birthday cake and party bags!)

Here we are at the final Harry Potter party post! If you are a fan, I hope you’ve enjoyed reading about our party 🙂

Obviously, I’ve left the most important bits until last…

The cake: Well, it wasn’t a huge success decoration-wise. But it still tasted pretty good 😉 There are lots of cake ideas on Pinterest….but they are mostly very complicated. So we put on our thinking caps to come up with our own idea:

Harry Potter birthday cake

I started with a chocolate cake cooked in a square tin.

For the decoration, I followed a tutorial I found at Moey’s Heart and Hearth. I used this technique a couple of years ago, and I have a few tips for you if you want to try this.

Tip 1 – Practice before the ‘big day’. The more you practice, the better you will get. That’s just common sense! As you can see, I thought I had learnt enough doing it once a couple of years ago. I had not!

Tip 2 – Moey does stress that the top of your cake must be flat. So make sure the top of your cake is flat! That was one lesson I learnt from last time, and I did better this year.

Tip 3 – Try and get your icing to go on smoothly. It’s very hard to see if you have any air bubbles, as you can see in mine.

Tip 4 – Place the decoration very carefully on top of your cake, as you can’t move it once it has been placed. Then peel off the paper as quickly and carefully as you can.

I had iced the cake roughly to represent brickwork. As you can see, I put the sign on the wrong way, and the ‘bricks’ go vertically instead of horizontally 😦 And I didn’t put it on straight.

The sign had been in the freezer while I iced the top of the cake, for at least 15 minutes as Moey suggests. I think to be safe, it should be in the freezer for a lot longer than you expect. As I peeled off the backing paper, the icing started to thaw and stuck to the paper. Thank goodness it was the top of the design where there was not much detail. I would have cried for real if it had been the bottom of the design that stuck.

So, I think the technique is fairly straightforward and certainly effective. But you do need to practice it!

To go with the birthday cake, I served Butterbeer. Apparently, Butterbeer tastes “a little bit like less-sickly butterscotch”. We had tested a couple of variations prior to the party, but the ‘recipe’ we liked best was caramel sauce, lemonade, and whipped cream.  I couldn’t find any butterscotch sauce, so went with caramel. We used squirty cream in a can since we were in a park and it was much more convenient than dealing with fresh whipped cream. The boys didn’t leave any behind, so I’m thinking they enjoyed it!

HP Butterbeer

Can you spy Hedwig peeking over the top of the cups? Pardon the blurry photo, it was taken quickly on my phone.

As the party ended and the guests left, they received their party bags. I was sure I had taken a photo of the actual bag, but it seems not. Here are the contents:

Harry Potter party bags

The bags contained:

A wand and water bottle

The mythical creatures they found from one of the games.

Quidditch word search

Bookmark

Chocolate coins from Gringotts Bank (label made on PicMonkey)

Bertie Bott’s Every Flavour Beans (label made on PicMonkey)

Golden Snitch (Ferrero Rocher chocolate with wings cut from paper) See another photo of them on my Instagram.

They also got to take home an Invisibility Cloak

HP Invisibility cloaks

It was very important that we included some of Bertie Bott’s beans. My research showed that you can buy them (they are made by Jelly Belly), but they are not cheap. Even ordinary Jelly Bellys are not cheap. I was very lucky to come across Belly Flops at the Reject Shop. They are irregular Jelly Belly beans. This bag cost me $6, and was perfect for what we wanted!

HP Bertie Botts substitutes

The actual party bags were simply brown paper bags. On the back I printed ‘Thank you for celebrating Luke’s 10th birthday’. On the front I wanted to put a fun Harry Potter quote. The birthday boy chose:

Study like Granger

Protect like Weasley

Live like Potter

Party like Holder!

See what he did there?? He loves this personalised quote!

So, there you have it – a Harry Potter birthday party for our 10 year old son. If there is anything I haven’t mentioned, please comment below and I will answer 🙂

Linking up with:

Average But Inspired – DIY Collective, 21 Rosemary Lane – Share Your Style, Posed Perfection – Creative Ways, Have a Daily Cup of Mrs Olson – Share Your Cup, Lamberts Lately – Create it Thursday, Domesblissity – Thriving on Thursdays, Wondermom Wannabe – This is How we Roll, Mainly Homemade – The Mommy Club, Twin Dragonfly Designs – The Handmade Hangout, Architecture of a Mom – A Little Bird Told Me, Love Bakes Good Cakes – Freedom Fridays, The Pin Junkie, Life With Lorelei – Home Matters, Shoestring Elegance – What to do Weekends, A Tray of Bliss – Five Star Frou Frou, Tatertots and Jello – Link Party Palooza, Raising Fairies and Knights – Bloggers Spotlight, Oh My Heartsie Girl – Friday Features, 24 Cottonwood Lane – Best of the Weekend, My Suburban Kitchen – Pinworthy Projects, Strawberry Butterscotch – Saturday Shuffle, The Pinterested Parent – Sunday’s Best, The Interior Frugalista – DIY Sunday Showcase, Nifty Thrifty Things, Love of Home – Sundays at Home, My Husband Has Too Many Hobbies – Snickerdoodle Sunday, That Recipe – Happiness is Homemade, Plucky’s Second Thought – Cooking and Crafting with J&J, My Pinterventures – Merry Monday, Claire Justine – Creative Mondays, Create With Joy – Inspire Me Monday, I Should be Mopping the Floor – Inspiration Monday, Yesterday on Tuesday – Project Inspired, Pastels and Macarons – The Creative Corner, Lou Lou Girls, Kathe With an E – You’re Gonna Love it Our Home Away From Home – Tuesdays at Our Home, Cozy Little House – Tweak it Tuesday, Ramblings of a (Bad) Domestic Goddess – Turn it up Tuesdays, The Dedicated House – Make it Pretty, Cedar Hill Farmhouse – The Scoop, The DIY Dreamer – From Dream to Reality, Oh My Heartsie Girl – Wonderful Wednesday, Savvy Southern Style – Wow us Wednesdays, Simply Made Fun – The Wednesday Roundup,